Description
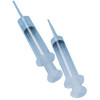
Reusable 807 Syringes can be loaded with your epoxy mixture for injecting into tight spots. Ideal for hardware bonding and small repairs. Holds 12 cc (about 0.4 fl oz).
Basic Hardener Bonding with Epoxy and 807 Syringes

Wet out a standard pilot hole with epoxy using an 807 Syringe, then install the fastener
For improved pullout strength and waterproof connections, the easiest method is to simply wet out the stripped fastener holes and new pilot holes before installing the screws. Epoxy penetrates the fiber around the hole, effectively increasing the fastener diameter. Epoxy also provides a stronger interface with the fastener threads than wood fiber and keeps out water.
- Wet out a standard-size pilot hole. Work the epoxy mixture well into the hole with a pipe cleaner or 807 Syringe. Use a high-strength bonding filler to thicken a second coat of epoxy as necessary for stripped or oversized holes.
- Insert the fastener in the hole and allow the epoxy to cure.
Bonding Hardware with Epoxy


Coat the hardware bottom and the fastener threads with thickened epoxy.
Drill oversized holes to increase the exposed substrate area and the amount of epoxy around the fastener.
Bonding hardware with epoxy goes a step beyond bonding the fasteners only. By bonding the hardware base directly to the surface you further increase hardware load capacity and provide a solid bearing surface for the hardware. It also seals the wood underneath and is a stronger, longer-lasting attachment than bonding the fasteners only. It is especially useful to mount hardware on curved, uneven or un-level surfaces.
- Prepare the mounting surface and the hardware base for good epoxy adhesion.
- Wet out the oversized hole with epoxy using an 807 Syringe. Allow the epoxy to soak into the exposed end grain of the wood (as with fastener bonding).
- Coat the bottom contact surface of the hardware with unthickened epoxy. Wire brush or sand the wet epoxy into the surface with 50-grit sandpaper.
- Use an 807 Syringe to inject a non-sagging epoxy/404 High-Density or 406 Colloidal Silica mixture into the hole. Use enough epoxy mixture so there are no voids in the hole after inserting the fastener. Coat the bottom of the hardware and the fastener threads with thickened epoxy.
- Place the hardware in position. Insert and tighten fasteners until a small amount of the epoxy mixture squeezes out of the joint.
- Remove excess epoxy or shape into a fillet. Allow the epoxy to cure at least 24 hours before applying load to the hardware. Allow more cure time in cooler weather.
Use 807 Syringes for epoxy bonding studs

Bond threaded rods or studs into the substrate as an alternative for easily removable hardware.
- Bond threaded rods or studs into the substrate (instead of bolts or screws) and attach the hardware with nuts. This variation is appropriate for many engine, motor or machine installations. Coat the base with wax /mold release to make the hardware removable. Although the hardware is not “bonded” to the substrate, the epoxy still provides a bearing surface that perfectly matches and supports the base of the hardware.
- Prepare the studs/threaded rods by waxing the upper ends (above the surface) and cleaning the lower ends (below the surface). Place a nut on the stud positioned with the top of the nut slightly above the surface and washer on the studs, wet out the lower ends and push them into the epoxy-filled holes. Allow the epoxy to cure thoroughly before tightening the nuts.
- Using an 807 Syringe, fill the hole 2/3 full with epoxy. Allow the epoxy to penetrate, and refill as necessary.
- Wet out the lower end of the stud and push it into the epoxy-filled hole. Top off the hole or clean away excess epoxy as necessary. Allow the epoxy to cure thoroughly before attaching hardware and tightening the nut.
Warranty Information
Specs
UPC: |
10811343012172 |
|
MPN:
|
80712
|
Pack: |
12 |


